Set Up a Server and Deploy a Clojure App to it
The bulk of this chapter describes how to use a suite of dark tools (Vagrant, Ansible, and some custom scripts) to set up a remote machine to serve a web application written in Clojure. I want this material to be accessible to n00blets and experienced people alike: if you’re a little unsure about what exactly a server is, the What’s a Server? section was written for you so that the rest of the book doesn’t feel quite as much like crazy shadow magic. If you’re impatient (how dark of you!) and want to just get a server running, you should skip ahead to the Your Beautiful Server section, where I spend a couple paragraphs describing the server you’ll be setting up.
After that, you’ll set up a virtual machine on your local computer and deploy an example Clojure application to it. I’m not going to spend too much time on the details (that’s what the rest of the book is for); rather, like an exhausted parent, I’ll take the “oh my god please just do it” approach. When you’re done with that you’ll set up and deploy to a real remote machine accessible by anyone with an Internet connection.
What’s a Server?
This section is for all the apprentice server admins out there. If you feel hazy about what exactly a server is, then I’ll help you gain clarity by walking you through what happens when you visit a URL with your browser. You’ll separate servers-as-machines from servers-as-programs, and you’ll learn how computers decide which program to use to respond to a request. You’ll also learn a bit about the process model, a foundational programming concept that has made my life way easier and that will make your life easier, too.
Machines and Programs
The term server is ambiguous because we use it to refer to both the program that handles a request, and the machine on which that program runs. To avoid that confusion, I’ll use machine to refer to the combination of hardware and operating system (also known as a computer) that runs programs, and I’ll use server to refer to programs.
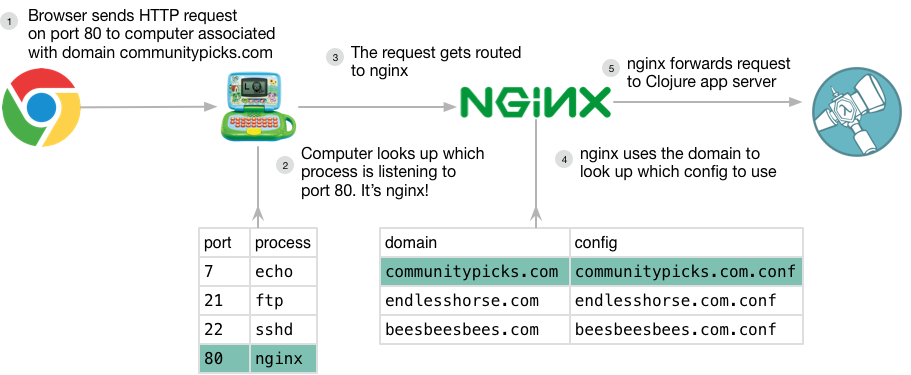
So, for example, when you visit http://www.communitypicks.com (which you should totally do JUST SAYIN), your browser figures out the IP address for the communitypicks.com domain and sends an HTTP request to that address, and a machine receives that request and routes it to a server program that it’s running.
How does the machine know which program to route the request to? It uses the request’s port number; by convention, HTTP requests use port 80. You can think of IP addresses and ports as kind of like the the phone and extension numbers that office buildings use. The phone number will get you the office’s directory, and the extension will let you talk to a specific person. Similarly, the IP address will route your request to some machine. And just like an office building has many tenants providing different services, a computer can run many different programs to provide different services: a web server, an email server, an SSH or FTP server — you get the idea. Ports are used to specify which service you want.
So! Once a machine receives a request from your browser, it routes the request to the program that’s listening on port 80. In our case, that’s nginx. nginx is one of the two most popular open-source web servers (the other is Apache). I like to use it because it’s simple to use and easy to configure.
Let’s talk about what it means to be a web server.
Processes
For many years after graduating from static site abominations to PHP-driven abominations, I continued to struggle with a vague sense that a web server (Apache, then), was somehow ~*special*~. I knew web servers were programs, but they felt somehow fundamentally different from the GUI applications I normally thought of as programs. It helped me to learn that, from the operating system’s perspective, there’s no such thing as a web server — or a browser, or image editing software, or WinAmp. It’s all just processes.
The process is the abstraction operating systems use to encapsulate and manage a running program, including the instructions the program executes and the program’s access to hardware resources like memory and network interfaces. From Computer Systems: A Programmer’s Perspective:
When a program… runs on a modern system, the operating system provides the illusion that the program is the only one running on the system. The program appears to have exclusive use of both the processor, main memory, and I/O devices. The processor appears to execute the instructions in the program, one after the other, without interruption. And the code and data of the program appear to be the only objects in the system’s memory. These illusions are provided by the notion of a process, one of the most important and successful ideas in computer science.
…The operating system keeps track of all the state information that the process needs in order to run. This state, which is known as the _context, includes information such as the current values of the PC, the register file, and the contents of main memory.
I’m sharing these details because they help clarify the perspective that web servers aren’t, in fact, special. From the operating system’s perspective, nginx is just another process. Like every other process, it reads input and writes output. The operating system provides ports as a mechanism for network communication, and any process is capable of listening to a port for requests; we just happen to configure nginx to listen to port 80 because that’s the convention for HTTP requests, and we want nginx to handle HTTP requests. If you wanted, you could write your own program that listens to port 80, or you could configure nginx to listen to some other port.
I think of it like working with LEGOs: from my perspective, I’m building a hamster house or a spaceship for dogs or some other dark shit, but from another perspective the constructs aren’t fundamentally different from each other. It’s just the same resources, organized differently. Web servers are like that: the same resources (network requests, memory, cpu time, etc), just organized differently from browsers and WinAmp and what-have-you.
We configure nginx to forward requests to our Clojure application by sending the requests to the IP address 127.0.0.1, port 3000. The address 127.0.0.1 is used to refer to the current machine, and we use it because the Clojure application is listening to port 3000 on the same machine as nginx. Like nginx, the Clojure application you’ll be building is also just a program, and it can listen to ports 'till the cows come home. Sometimes I’ll refer to it as the application server. The Clojure application does all the work of interacting with Datomic. See Figure 1.1.
Now let’s talk about how you’ll set up a machine to serve your Clojure application.
|
Note
|
Learn more about processes
If you’re interested in learning more about processes, the book Computer Systems: A Programmer’s Perspective is what helped me finally “get it”. I’ve linked to the 2nd edition because that’s what I used and it’s less expensive than the 3rd edition. As a self-taught programmer, it’s been one of the most useful books in my career because it demystified many aspects of software development. It helped me understand what a program actually is, for example. Chapter 3 of Advanced Linux Programming is also useful; I’ve linked to free PDFs. |
Your Beautiful Little Server
The server you’re building will run a Clojure application that’s been packaged as an uberjar. When you run that uberjar, it will start its own HTTP server. (Read Building, Running, and the REPL from Clojure for the Brave and True if you’re unfamiliar with uberjars and running Java programs.)
In this case, the Clojure application will be an example that you’ll download. The example application will let you create and manage role-playing character sheets. It has a front-end browser client written in Clojurescript (of course), and a backend HTTP component that handles requests to create, read, update, and delete the character sheets.
As a dev from the shadows, you want to get the most out of your hardware by running multiple web apps on one machine. You want to be able to host, for example, application servers for dubstepkazoo.com and morekazoo.com on the same machine. Therefore, you can’t configure your application server to listen to port 80, because that would make it impossible for your machine to serve other applications.
To meet this requirement, you’ll install an nginx web server that listens to port 80 and routes incoming HTTP requests to your applications. When nginx gets a request, it forwards it to your applications' HTTP servers based on the domain name of the request. See Figure 1.1.
Finally, you’ll also install Datomic Free and set up the configuration necessary for your application to talk to Datomic.
Figure 1.1: HTTP request path
Setup
Before you can build and deploy the example Clojure application,
you’ll need to download it (of course) and install
Homebrew (Macintosh only),
Boot,
Ansible,
VirtualBox, and
Vagrant. I’ve included installation
instructions for Mac and Ubuntu machines below. If you’re using
another Linux distro, I’m assuming u r l33t hax0r and you’ll be able
to install these tools without guidance.
Some of these tools can take a while to download… Hey, maybe check out the DevOps Community Picks while you wait? (Using the tutorial I’ve spent hours and hours writing to market my side project… from the shadows.)
Mac
Run the following on the command line:
install deployment tools on a Mac
# install Homebrew
/usr/bin/ruby -e "$(curl -fsSL https://raw.githubusercontent.com/Homebrew/install/master/install)"

# install boot
brew install boot-clj

# install ansible
brew install ansible

# install VirtualBox
brew cask install virtualbox

# install vagrant
brew cask install vagrant
Ubuntu
Run the following on the command line:
install deployment tools on Ubuntu
# install boot
# if you have nix:
nix-env -i boot
# otherwise:
sudo bash -c "cd /usr/local/bin && curl -fsSLo boot https://github.com/boot-clj/boot-bin/releases/download/latest/boot.sh && chmod 755 boot"

# install ansible
sudo apt-get install software-properties-common
sudo apt-add-repository ppa:ansible/ansible
sudo apt-get update
sudo apt-get install ansible

# install VirtualBox
sudo apt-get install virtualbox

# install vagrant
sudo apt-get install vagrant
Check Your Installation
You can run the commands below to check that everything was installed correctly. The output you get should be similar to the output listed here.
For boot:
Check boot installation
boot --versionYou should see:
#http://boot-clj.com
#Thu Feb 02 14:15:12 EST 2017
BOOT_CLOJURE_NAME=org.clojure/clojure
BOOT_CLOJURE_VERSION=1.9.0-alpha12
BOOT_VERSION=2.7.1
For ansible:
Check ansible installation
ansible --versionYou should see:
ansible 2.2.1.0
  config file =
  configured module search path = Default w/o overrides
For VirtualBox:
Check VirtualBox installation
VirtualBox --helpYou should see the following, and a bunch of help text:
Oracle VM VirtualBox Manager 5.1.10
(C) 2005-2016 Oracle Corporation
All rights reserved.
For vagrant:
Check vagrant installation
vagrant --helpVagrant 1.8.7Get the Example App
Now that you have all the tools installed, you’ll need to download the
Character
Sheet Example app and cd to its directory. If you have git
installed, do this:
Get example app with git
git clone https://github.com/sweet-tooth-clojure/character-sheet-example.git
cd character-sheet-example
If you’re unfamiliar with git, learning it is one of the best investments you can make in your programming career. There’s a great free book online where you can learn it. In the mean time, you can run these commands to download the app and move to its directory:
Download example app zip file
curl -LOks https://github.com/sweet-tooth-clojure/character-sheet-example/archive/master.zip
unzip master.zip
cd character-sheet-example/infrastructure
It’s worth pointing out that there’s nothing special about the infrastructure directory. It’s just my personal preference to put all server management code in an infrastructure directory.
Lastly, you’ll need to install the Ansible roles that do most of the work. You’ll learn all about roles in the next chapter. Run the following command to install the roles from Ansible Galaxy, Ansible’s service for hosting and discovering roles (kinda like Ruby gems or Clojars):
Install Ansible roles
ansible-galaxy install -r ansible/requirements.ymlThese roles are part of the Sweet Tooth collection of libraries I’ve been putting together for Clojure development, and you can find them at the GitHub sweet tooth organization. Look for the repos that are prefixed with ansible-role-
|
Note
|
Not production ready
With the exception of the Ansible roles, the Sweet Tooth libs aren’t production ready or even collaboration ready. I won’t be taking pull requests or fielding questions about them for some time. #gitgrump |
Create a Virtual Machine
Now that we have everything installed, let’s create a virtual machine (VM) and set it up. Think of VMs as computers that are implemented as software. They have an operating system and manage processes just like the computer you’re using right now, but instead of physical hardware they rely on emulated hardware. The computer you use to start a VM is called the host.
We’re creating a VM because it lets us try out our server setup and deployment process more quickly and cheaply than using an actual server from a hosting company; we get a tighter feedback loop.
To create the VM, run this command:
Start a Virtual Machine
vagrant upvagrant up will take a few minutes to run because it’s doing
a lot. It’s downloading an Ubuntu image and creating your virtual
machine, and it’s also running scripts to set up the VM. The scripts
are downloading packages like nginx and datomic, and uploading files
to configure those services.
When Vagrant’s done, The last line of output it produces should look something like:
PLAY RECAP *********************************************************************
default                    : ok=31   changed=27   unreachable=0    failed=0
And that’s it! The server should now have nginx and datomic installed,
and it should be ready for you to deploy the example app. If you want
to shut down your vagrant server, just run vagrant halt. If you do
something crazy and want to start from scratch, run vagrant destroy
-f. This will delete the virtual machine you created; you can
recreate it with vagrant up. (This ability to quickly recreate VMs
is part of what makes them so useful.)
Build and Deploy to a VM
Run this command from within the character-sheet-example/infrastructure directory:
build and deploy the app
./build && ./deploy devbuild and deploy are both tiny shell scripts (three lines
each)../build will take a few minutes to run while it downloads
dependencies, compiles clojurescript, and packs everything into an
uberjar. Then ./deploy dev copies the uberjar to your VM, runs
database migrations, runs a basic check that the app is functioning,
and starts the app as an Ubuntu service. When it’s done, you should be
able to view the example app by going to http://localhost:3100/ on
your computer (not the VM). The screen should look something like
this:
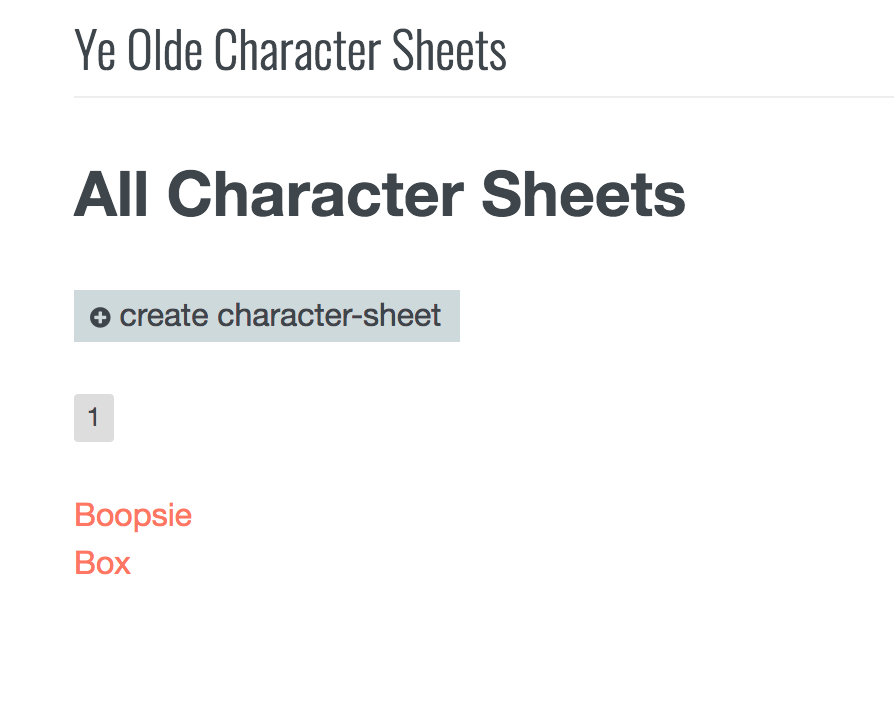
Bam! You have deployed a Clojure application to a server running on
your computer. Whenever you change your Clojure app, you can build and
deploy it again by running ./build && ./deploy dev from the
infrastructure directory. The deployment will follow the same steps
every time, without any manual intervention on your part. What’s even
better is that you can be confident that this process will work on a
real server, something we’ll try in the next section.
Set Up and Deploy to a VPS
A virtual private server (VPS) is essentially a virtual machine provided by a hosting company. Unlike Geocities of yesteryear or Squarespace/Tumblr/Wordpress of todayyear, you’re given root access to a machine and it’s up to you to set it up to serve your app.
My favorite VPS host is Digital Ocean. I’ve used them for more than three years and love them! Their customer support is responsive and helpful, they have a huge library of well-written documents on working with servers, and their tools make it simple and easy to create new servers. If you sign up using the above link, you’ll get a $10 credit (and I’ll get a $25 credit, yay), enough to run a server with 1gb of RAM and 30gb of SSD disk space for a month, or 2gb of RAM and 40gb for 15 days. Just a heads up: the signup process will ask you for a credit card.
One great thing about Digital Ocean is that it only bills you for the amount of time your servers run: you could sign up, create a 2gb server to use as you go through this tutorial (what I recommend), and then immediately delete the server, and you’ll never get charged. It’s a cost-free way to try this stuff out, as long as you’re diligent about deleting your server afterward. In this section, I’ll walk you through the entire process, showing you both how to create a server and delete it.
After you sign up, you’ll see a screen asking you create a droplet:

Droplet is digital ocean’s trademark branded term for VPS. Click “create droplet”, and you’ll be greeted with a screen that looks like this:

Choose an Ubuntu 14.04.5 x64 server.
Close to the bottom of the page you’ll be asked to add an SSH key. You’ll need to add an SSH key for the deploy scripts to work. If you’re unfamiliar with the process, Digital Ocean has a quick, helpful guide.
The next section prompts you to give your droplet a name. This is for your human use only; it doesn’t impact the server’s functioning. Try naming it "deploy-quest".
When you’re done, click "create", and in less than a minute your server will be ready to use! Digital Ocean shows a nice little progress bar while it sets up your server, and when it’s done it should show you the IP address of your server. Try visiting it in a browser:
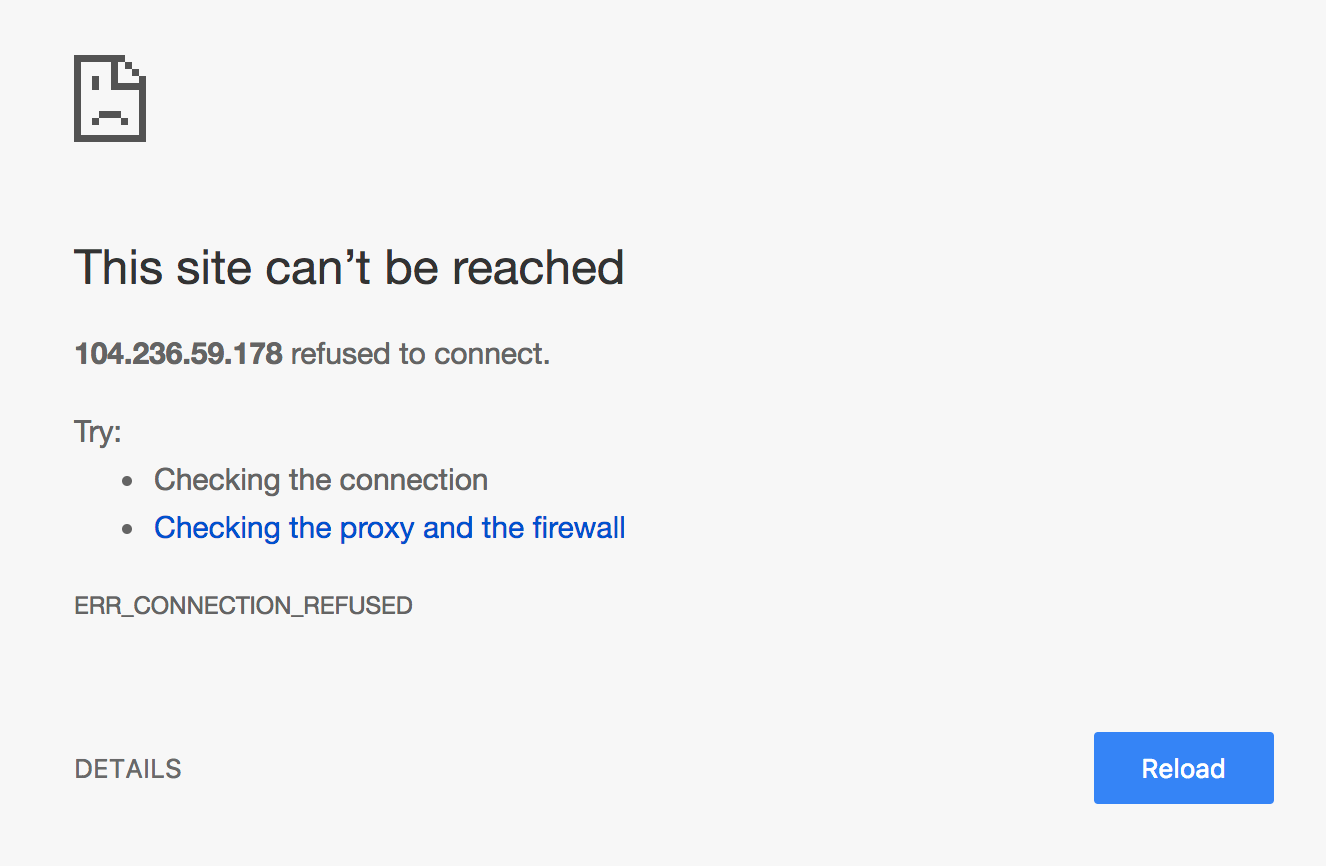
It doesn’t work because we haven’t set up the server to actually serve
anything. All it takes is to update the file
character-sheet-example/infrastructure/ansible/inventories/prod/hosts
by replacing the text character-sheet-example-prod on the first line
with your server’s IP address. The demo server I’m using as I write
this has the IP address 138.197.66.144, so my file looks like this:
default ansible_ssh_host=138.197.66.144 ansible_ssh_user=root

[webservers]
default

[database]
default
(If you have a domain name configured to point to your droplet, you can just use the domain name instead of the IP address.)
Now, update the file
character-sheet-example/infrastructure/ansible/inventories/prod/group_vars/webservers
by using your IP address for clojure_uberjar_webapp_domain (for a
real site, you would use the real domain name). It should look
something like this:
# -*- mode: yaml -*-
---
clojure_uberjar_webapp_domain: 138.197.66.144
clojure_uberjar_webapp_app_env_local_path: files/env/prod.sh
Now all you have to do is run these commands on the command line from the character-sheet-example/infrastructure directory:
./provision prod
./deploy prod
If all goes well, you should be able to visit the IP address in your browser and see the example app:
Not bad! Just a couple configuration tweaks and the app is online, ready for the world to see. It takes very little work to set up a server and deploy a Clojure app, and I think that’s pretty exciting!
Now you know how to deploy a Clojure application that follows the conventions I follow in my personal projects. To get this working with your own application, you’ll probably have to do a bit of customization.
Using with Your Own Application
So this all works great with the example app, but chances are your setup doesn’t match the example app. Here’s what you need to know to get this working with your own project.
When you run ./build and ./deploy dev or ./deploy prod, the
scripts make a couple assumptions about where your
uberjar is. ./build uses boot to create an uberjar and save it to
character-sheet-example/target/build/app.jar. The deploy script
copies character-sheet-example/target/build/app.jar to
character-sheet-example/infrastructure/ansible/files/app.jar.
The deploy script then invokes an Ansible script that does the heavy lifting of copying your uberjar to the server. The Ansible script is written in such a way that it expects to find your uberjar (app.jar) in the character-sheet-example/infrastructure/ansible/files directory. If you’re not familiar with Ansible, don’t worry: most of the rest of this book is dedicated to explaining how to use Ansible in general and how to use the Clojure-specific scripts in particular.
When you use the build and deploy scripts for your own project, you’ll probably need to modify either the scripts or your build process so that the uberjar eventually ends up at character-sheet-example/infrastructure/ansible/files/app.jar (where character-sheet-example is the directory of your project, of course).
For example, if you have a Leiningen project under the directory
\~/my-bodacious-project, you could copy the
character-sheet-example/infrastructure directory to it with cp -R
character-sheet-example/infrastructure ~/my-bodacious-project. Then,
you’ll need to modify both
~/my-bodacious-project/infrastructure/build and
~/my-bodacious-project/infrastructure/deploy. You’ll need to
replace the text target/build/app.jar with something like
target/uberjar/my-bodacious-project-0.1.0-SNAPSHOT-standalone.jar.
In ~/my-bodacious-project/infrastructure/build you’ll need to
replace the line boot build with lein uberjar. After that,
everything should work.
To round out this walkthrough, let’s take a quick look at a couple more bits you’ll find useful: how to set environment variables and log file locations.
Environment Variables and Log Files
Real applications often use environment variables for configuration. For example, Community Picks uses reddit’s oauth system for authentication. As part of the oauth process, the Community Picks server sends a request to reddit’s oauth server, and that request must include a client ID and a client secret. The client ID and secret are read from environment variables.
You can set the variables for your Vagrant VM environment by modifying character-sheet-example/infrastructure/ansible/files/env/dev.sh. Here’s part of my Community Picks config:
export CA_OAUTH_CLIENT_ID="abc123"
export CA_OAUTH_CLIENT_SECRET="supersupersecret"
export CA_OAUTH_REDIRECT_URI="http://localhost:3000/session/confirm"
For your Digital Ocean server, modify the file character-sheet-example/infrastructure/ansible/files/env/prod.sh.
The last item of interest is the locations of log files. If the IP address you used was 138.197.66.144, then log files for the Clojure application are at /var/log/138-197-66-144/138-197-66-144.log. Nginx access and error logs are at /var/log/nginx/138-197-66-144.access.log and /var/log/nginx/138-197-66-144.error.log.
And that’s the quick guide to painlessly deploying a Clojure app!
Recap
In this section, you set up your computer to perform quick and painless Clojure deployments. You installed Boot, Ansible, Virtualbox, and Vagrant, and you used them to deploy an example Clojure application to a local VM. You may have even deployed the app to a VPS hosted by Digital Ocean. You discovered that deploying a Clojure application can be easy, and you felt a pleasant warmth as you brain released a tiny bit of dopamine into your system.
Seriously though - I spent a lot of time working out how to deploy sites with minimum hassle, and I hope the result is as exciting to you as it is to me. In the next section, I’ll walk you through the code I wrote and share what I’ve learned in my years as a DevOps amateur working on small-scale deployments. If you’d like to learn exactly how the tools you used work together to set up your server, or if you’d like to learn a bit about server management, read on!
Command Summary
Here’s all the command you ran for easy reference:
Mac Setup
install deployment tools on a Mac
# install Homebrew
/usr/bin/ruby -e "$(curl -fsSL https://raw.githubusercontent.com/Homebrew/install/master/install)"

# install boot
brew install boot-clj

# install ansible
brew install ansible

# install VirtualBox
brew cask install virtualbox

# install vagrant
brew cask install vagrant
Ubuntu Setup
Ubuntu
Run the following on the command line:
install deployment tools on Ubuntu
# install boot
# if you have nix:
nix-env -i boot
# otherwise:
sudo bash -c "cd /usr/local/bin && curl -fsSLo boot https://github.com/boot-clj/boot-bin/releases/download/latest/boot.sh && chmod 755 boot"

# install ansible
sudo apt-get install software-properties-common
sudo apt-add-repository ppa:ansible/ansible
sudo apt-get update
sudo apt-get install ansible

# install VirtualBox
sudo apt-get install virtualbox

# install vagrant
sudo apt-get install vagrant
Download Example App, Build, Deploy
git clone https://github.com/sweet-tooth-clojure/character-sheet-example.git
cd character-sheet-example/infrastructure
ansible-galaxy install -r ansible/requirements.yml
vagrant up
./build && ./deploy dev
Provision and Deploy to Prod
./provision prod
./deploy prod|
Note
|
Tales of Chaos and Madness …From the Shadows
One day when I was in class in high school I got called to the office. My mom was there because my pet iguana had gotten out of my room and made its way downstairs to the kitchen, where it was happily eating tomatoes. She didn’t want to go near it and needed me to put it back where it belonged. So, we went home and did that, and afterward she took me out to IHOP with her, where I had delicious pancakes. After that, I would occassionally leave the my bedroom door open on purpose so that I could get out of school and have lunch with my mom. So dark! |