(setq initial-frame-alist '((top . 0) (left . 0) (width . 120) (height . 80)))
Chapter 2
How to Use Emacs, an Excellent Clojure Editor
On your journey to Clojure mastery, your editor will be your closest ally. I highly recommend working with Emacs, but you can, of course, use any editor you want. If you don’t follow the thorough Emacs instructions in this chapter, or if you choose to use a different editor, it’s worthwhile to at least invest some time in setting up your editor to work with a REPL. Two alternatives that I recommend and that are well regarded in the community are Cursive and Nightcode.
The reason I recommend Emacs is that it offers tight integration with a Clojure REPL, which allows you to instantly try out your code as you write. That kind of tight feedback loop will be useful while learning Clojure and, later, when writing real Clojure programs. Emacs is also great for working with any Lisp dialect; in fact, Emacs is written in a Lisp dialect called Emacs Lisp (elisp).
By the end of this chapter, your Emacs setup will look something like Figure 2-1.

Figure 2-1: A typical Emacs setup for working with Clojure—code on one side, REPL on the other
To get there, you’ll start by installing Emacs and setting up a new-person-friendly Emacs configuration. Then you’ll learn the basics: how to open, edit, and save files, and how to interact with Emacs using essential key bindings. Finally, you’ll learn how to actually edit Clojure code and interact with the REPL.
Installation
You should use the latest major version of Emacs, Emacs 24, for the platform you’re working on:
- OS X Install vanilla Emacs as a Mac app from http://emacsformacosx.com. Other options, like Aquamacs, are supposed to make Emacs more “Mac-like,” but they’re problematic in the long run because they’re set up so differently from standard Emacs that it’s difficult to use the Emacs manual or follow along with tutorials.
- Ubuntu Follow the instructions at https://launchpad.net/~cassou/+archive/emacs.
- Windows You can find a binary at http://ftp.gnu.org/gnu/emacs/windows/. After you download and unzip the latest version, you can run the Emacs executable under bin\runemacs.exe.
After you’ve installed Emacs, open it. You should see something like Figure 2-2.
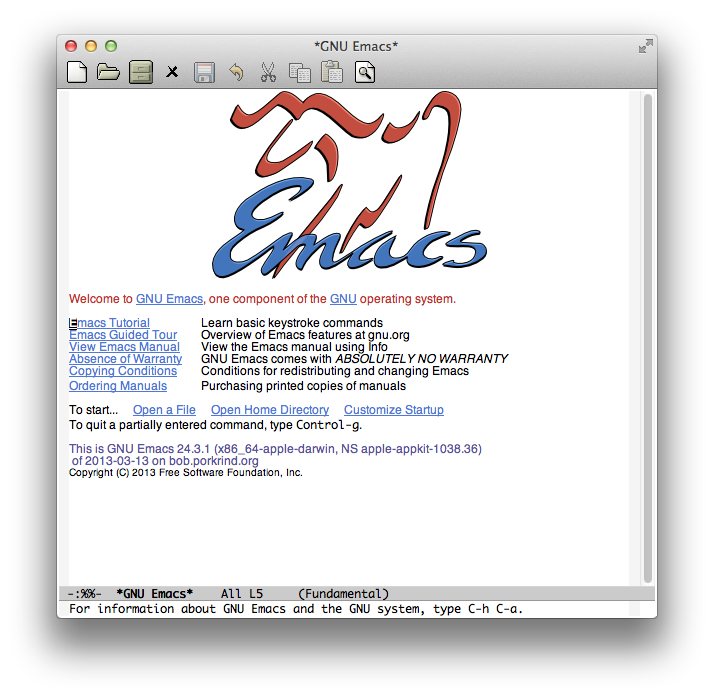
Figure 2-2: The screen Emacs displays when you open it for the first time
Welcome to the cult of Emacs! You’ve made Richard Stallman proud!
Configuration
I’ve created a repository of all the files you need to configure Emacs for Clojure, available at https://github.com/flyingmachine/emacs-for-clojure/archive/book1.zip.
NOTE: These tools are constantly being updated, so if the instructions below don't work for you or you want to use the latest configuration, please read the instructions at https://github.com/flyingmachine/emacs-for-clojure/.
Do the following to delete your existing Emacs configuration and install the Clojure-friendly one:
- Close Emacs.
- Delete ~/.emacs or ~/.emacs.d if they exist. (Windows users, your emacs files will probably live in C:\Users\your_user_name\AppData\Roaming\. So, for example, you would delete C:\Users\jason\AppData\Roaming\.emacs.d.) This is where Emacs looks for configuration files, and deleting these files and directories will ensure that you start with a clean slate.
- Download the Emacs configuration zip file listed above and unzip it. Its contents should be a folder, emacs-for-clojure-book1. Run mv path/to/emacs-for-clojure-book1 ~/.emacs.d.
- Open Emacs.
When you open Emacs, you may see a lot of activity as Emacs downloads a bunch of useful packages. Once the activity stops, go ahead and just quit Emacs, and then open it again. (If you don't see any activity, that's OK! Quit and restart Emacs just for funsies.) After you do so, you should see a window like the one in Figure 2-3.

Figure 2-3: How Emacs looks after installing your sweet new configuration
Now that we’ve got everything set up, let’s learn how to use Emacs!
Emacs Escape Hatch
Before we dig in to the fun stuff, you need to know an important Emacs key binding: ctrl-G. This key binding quits whatever Emacs command you’re trying to run. So if things aren’t going right, hold down ctrl, press G, and then try again. It won’t close Emacs or make you lose any work; it’ll just cancel your current action.
Emacs Buffers
All editing happens in an Emacs buffer. When you first start Emacs, a buffer named *scratch* is open. Emacs will always show you the name of the current buffer at the bottom of the window, as shown in Figure 2-4.

Figure 2-4: Emacs will always show you the name of the current buffer.
By default, the *scratch* buffer handles parentheses and indentation in a way that’s optimal for Lisp development but is inconvenient for writing plain text. Let’s create a fresh buffer so we can play around without having unexpected things happen. To create a buffer, do this:
- Hold down ctrl and press X.
- Release ctrl.
- Press B.
We can express the same sequence in a more compact format: C-x b.
After performing this key sequence, you’ll see a prompt at the bottom of the application, as shown in Figure 2-5.

Figure 2-5: The minibuffer is where Emacs prompts you for input.
This area is called the minibuffer, and it is where Emacs prompts you for input. Right now it’s prompting us for a buffer name. You can enter the name of a buffer that is already open, or you can enter a new buffer name. Type in emacs-fun-times and press enter. You should now see a completely blank buffer and can just start typing. You’ll find that keys mostly work the way you’d expect. Characters appear as you type them. The up, down, left, and right arrow keys move you as you’d expect, and enter creates a new line.
You’ll also notice that you’re not suddenly sporting a bushy Unix beard or Birkenstocks (unless you had them to begin with). This should help ease any lingering trepidation you feel about using Emacs. When you’re done messing around, go ahead and kill the buffer by typing C-x k enter. (It might come as a surprise, but Emacs is actually quite violent, making ample use of the term kill.)
Now that you’ve killed the emacs-fun-times buffer, you should be back in the *scratch* buffer. In general, you can create as many new buffers as you want with C-x b. You can also quickly switch between buffers using the same command. When you create a new buffer this way, it exists only in memory until you save it as a file; buffers aren’t necessarily backed by files, and creating a buffer doesn’t necessarily create a file. Let’s learn about working with files.
Working with Files
The key binding for opening a file in Emacs is C-x C-f. Notice that you’ll need to hold down ctrl when pressing both X and F. After you do that, you’ll get another minibuffer prompt. Navigate to ~/.emacs.d/customizations/ui.el, which customizes the way Emacs looks and how you can interact with it. Emacs opens the file in a new buffer with the same name as the filename. Let’s go to line 37 and uncomment it by removing the leading semicolons. It will look like this:
Then change the values for width and height, which set the dimensions in characters for the active window. By changing these values, you can set the Emacs window to open at a certain size every time it starts. Try something small at first, like 80 and 20:
(setq initial-frame-alist '((top . 0) (left . 0) (width . 80) (height . 20)))
Now save your file with the following key binding: C-x C-s. You should get a message at the bottom of Emacs like Wrote /Users/snuffleupagus/.emacs.d/customizations/ui.el. You can also try saving your buffer using the key binding you use in other applications (for example, ctrl-S or cmd-S). The Emacs configuration you downloaded should allow that to work, but if it doesn’t, it’s no big deal.
After saving the file, quit Emacs and start it again. I bet it’s very tiny! See my example in Figure 2-6.

Figure 2-6: You can configure Emacs to set its height and width every time you open it.
Go through that same process a couple of times until Emacs starts at a size that you like. Or just comment out those lines again and be done with it (in which case Emacs will open at its default width and height). If you’re done editing ui.el, you can close its buffer with C-x k. Either way, you’re done saving your first file in Emacs! If something crazy happens, you can follow the instructions in “Configuration” on page 13 to get Emacs working again.
If you want to create a new file, just use C-x C-f and enter the new file’s path in the minibuffer. As soon as you save the buffer, Emacs will create a file with the buffer’s contents at the path you entered.
Let’s recap:
- In Emacs, editing takes place in buffers.
- To switch to a buffer, use C-x b and enter the buffer name in the minibuffer.
- To create a new buffer, use C-x b and enter a new buffer name.
- To open a file, use C-x C-f and navigate to the file.
- To save a buffer to a file, use C-x C-s.
- To create a new file, use C-x C-f and enter the new file’s path. When you save the buffer, Emacs will create the file on the filesystem.
Key Bindings and Modes
You’ve already come a long way! You can now use Emacs like a very basic editor. This should help you get by if you ever need to use Emacs on a server or are forced into pairing with an Emacs nerd.
However, to really be productive, it’ll be useful for you to know some key details about key bindings (ha-ha!). Then I’ll introduce Emacs modes. After that, I’ll cover some core terminology and go over a bunch of super useful key bindings.
Emacs Is a Lisp Interpreter
The term key binding derives from the fact that Emacs binds keystrokes to commands, which are just elisp functions (I’ll use command and function interchangeably). For example, C-x b is bound to the function switch-to-buffer. Likewise, C-x C-s is bound to save-file.
But Emacs goes even further than that. Even simple keystrokes like f and a are bound to a function, in this case self-insert-command, the command for adding characters to the buffer you’re editing.
From Emacs’s point of view, all functions are created equal, and you can redefine all functions, even core functions like save-file. You probably won’t want to redefine core functions, but you can.
You can redefine functions because, at its core, Emacs is just a Lisp interpreter that happens to load code-editing facilities. Most of Emacs is written in elisp, so from the perspective of Emacs, save-file is just a function, as is switch-to-buffer and almost any other command you can run. Not only that, but any functions you create are treated the same way as built-in functions. You can even use Emacs to execute elisp, modifying Emacs as it runs.
The freedom to modify Emacs using a powerful programming language is what makes Emacs so flexible and why people like me are so crazy about it. Yes, it has a lot of surface-level complexity that can take time to learn. But underlying Emacs is the elegant simplicity of Lisp and the infinite tinkerability that comes with it. This tinkerability isn’t limited to just creating and redefining functions. You can also create, redefine, and remove key bindings. Conceptually, key bindings are just an entry in a lookup table associating keystrokes with functions, and that lookup table is completely modifiable.
You can also run commands by name, without a specific key binding, using M-x function-name (for example, M-x save-buffer). M stands for meta, a key that modern keyboards don’t possess but which is mapped to alt on Windows and Linux and option on Macs. M-x runs the smex command, which prompts you for the name of another command to be run.
Now that you understand key bindings and functions, you’ll be able to understand what modes are and how they work.
Modes
An Emacs mode is a collection of key bindings and functions that are packaged together to help you be productive when editing different types of files. (Modes also do things like tell Emacs how to do syntax highlighting, but that’s of secondary importance, and I won’t cover that here.)
For example, when you’re editing a Clojure file, you’ll want to load Clojure mode. Right now I’m writing a Markdown file and using Markdown mode, which has lots of useful key bindings specific to working with Markdown. When editing Clojure, it’s best to have a set of Clojure-specific key bindings, like C-c C-k to load the current buffer into a REPL and compile it.
Modes come in two flavors: major modes and minor modes. Markdown mode and Clojure mode are major modes. Major modes are usually set by Emacs when you open a file, but you can also set the mode explicitly by running the relevant Emacs command, for example with M-x clojure-mode or M-x major-mode. Only one major mode is active at a time.
Whereas major modes specialize Emacs for a certain file type or language, minor modes usually provide functionality that’s useful across file types. For example, abbrev mode “automatically expands text based on pre-defined abbreviation definitions” (per the Emacs manual1.). You can have multiple minor modes active at the same time.
You can see which modes are active on the mode line, as shown in Figure 2-7.

Figure 2-7: The mode line shows you which modes are active.
If you open a file and Emacs doesn’t load a major mode for it, chances are that one exists. You’ll just need to download its package. Speaking of which . . .
Installing Packages
Many modes are distributed as packages, which are just bundles of elisp files stored in a package repository. Emacs 24, which you installed at the beginning of this chapter, makes it very easy to browse and install packages. M-x package-list-packages will show you almost every package available; just make sure you run M-x package-refresh-contents first so you get the latest list. You can install packages with M-x package-install.
You can also customize Emacs by loading your own elisp files or files you find on the Internet. The “Beginner’s Guide to Emacs” (found at http://www.masteringemacs.org/articles/2010/10/04/beginners-guide-to-emacs/) has a good description of how to load customizations under the section “Loading New Packages” toward the bottom of the article.
Core Editing Terminology and Key Bindings

If all you want to do is use Emacs like a text editor, you can skip this section entirely! But you’ll be missing out on some great stuff. In this section, we’ll go over key Emacs terms; how to select, cut, copy, and paste text; how to select, cut, copy, and paste text (see what I did there? Ha ha ha!); and how to move through the buffer efficiently.
To get started, open a new buffer in Emacs and name it jack-handy. Then enter the following Jack Handy quotations:
If you were a pirate, you know what would be the one thing that would
really make you mad? Treasure chests with no handles. How the hell are
you supposed to carry it?!

The face of a child can say it all, especially the mouth part of the
face.

To me, boxing is like a ballet, except there's no music, no
choreography, and the dancers hit each other.
Use this example to experiment with navigation and editing in this section.
Point
If you’ve been following along, you should see a red-orange rectangle in your Emacs buffer. This is the cursor, and it’s the graphical representation of the point. Point is where all the magic happens: you insert text at point, and most editing commands happen in relation to point. And even though your cursor appears to rest on top of a character, point is actually located between that character and the previous one.
For example, place your cursor over the f in If you were a pirate. Point is located between I and f. Now, if you use C-k, all the text from the letter f onward will disappear. C-k runs the command kill-line, which kills all text after point on the current line (I’ll talk more about killing later). Undo that change with C-/. Also, try your normal OS key binding for undo; that should work as well.
Movement
You can use your arrow keys to move point just like any other editor, but many key bindings allow you to navigate more efficiently, as shown in Table 2-1.
- Table 2-1: Key Bindings for Navigating Text
| Keys | Description |
|---|---|
| C-a | Move to beginning of line. |
| M-m | Move to first non-whitespace character on the line. |
| C-e | Move to end of line. |
| C-f | Move forward one character. |
| C-b | Move backward one character. |
| M-f | Move forward one word (I use this a lot). |
| M-b | Move backward one word (I use this a lot, too). |
| C-s | Regex search for text in current buffer and move to it. Press C-s again to move to next match. |
| C-r | Same as C-s, but search in reverse. |
| M-< | Move to beginning of buffer. |
| M-> | Move to end of buffer. |
| M-g g | Go to line. |
Go ahead and try out these key bindings in your jack-handy buffer!
Selection with Regions
In Emacs, we don’t select text. We create regions, and we do so by setting the mark with C-spc (ctrl-spacebar). Then, when you move point, everything between mark and point is the region. It’s very similar to shift-selecting text for basic purposes.
For example, do the following in your jack-handy buffer:
- Go to the beginning of the file.
- Use C-spc.
- Use M-f twice. You should see a highlighted region encompassing If you.
- Press backspace. That should delete If you.
One cool thing about using mark instead of Shift-selecting text is that you’re free to use all of Emacs’s movement commands after you set the mark. For example, you could set a mark and then use C-s to search for some bit of text hundreds of lines down in your buffer. Doing so would create a very large region, and you wouldn’t have to strain your pinky holding down shift.
Regions also let you confine an operation to a limited area of the buffer. Try this:
- Create a region encompassing The face of a child can say it all.
- Use M-x replace-string and replace face with head.
This will perform the replacement within the current region rather than the entire buffer after point, which is the default behavior.
Killing and the Kill Ring
In most applications we can cut text, which is only mildly violent. We can also copy and paste. Cutting and copying add the selection to the clipboard, and pasting copies the contents of the clipboard to the current application. In Emacs, we take the homicidal approach and kill regions, adding them to the kill ring. Don’t you feel braver and truer knowing that you’re laying waste to untold kilobytes of text? We can then yank, inserting the most recently killed text at point. We can also copy text to the kill ring without actually killing it.
Why bother with all this morbid terminology? Well, first, so you won’t be frightened when you hear someone talking about killing things in Emacs. But more important, Emacs allows you to do tasks that you can’t do with the typical cut/copy/paste clipboard featureset.
Emacs stores multiple blocks of text on the kill ring, and you can cycle through them. This is cool because you can cycle through to retrieve text you killed a long time ago. Let’s see this in action:
- Create a region over the word Treasure in the first line.
- Use M-w, which is bound to the
kill-ring-savecommand. In general, M-w is like copying. It adds the region to the kill ring without deleting it from your buffer. - Move point to the word choreography on the last line.
-
Use M-d, which is bound to the
kill-wordcommand. This adds choreography to the kill ring and deletes it from your buffer. - Use C-y. This will yank the text you just killed, choreography, inserting it at point.
- Use M-y. This will remove choreography and yank the next item on the kill ring, Treasure.
You can see some useful kill/yank key bindings in Table 2-2.
- Table 2-2: Key Bindings for Killing and Yanking Text
| Keys | Description |
|---|---|
| C-w | Kill region. |
| M-w | Copy region to kill ring. |
| C-y | Yank. |
| M-y | Cycle through kill ring after yanking. |
| M-d | Kill word. |
| C-k | Kill line. |
Editing and Help
Table 2-3 shows some additional, useful, editing key bindings you should know about for dealing with spacing and expanding text.
- Table 2-3: Other Useful Editing Key Bindings
| Keys | Description |
|---|---|
| Tab | Indent line. |
| C-j | New line and indent, equivalent to enter followed by tab. |
| M-/ | Hippie expand; cycles through possible expansions of the text before point. |
| M-\ | Delete all spaces and tabs around point. (I use this one a lot.) |
Emacs also has excellent built-in help. The two key bindings shown in Table 2-4 will serve you well.
- Table 2-4: Key Bindings for Built-in Help
| Keys | Description |
|---|---|
| C-h k key-binding | Describe the function bound to the key binding. To get this to work, you actually perform the key sequence after typing C-h k. |
| C-h f | Describe function. |
The help text appears in a new window, a concept I will cover later in the chapter. For now, you can close help windows by pressing C-x o q.
Using Emacs with Clojure
Next, I’ll explain how to use Emacs to efficiently develop a Clojure application. You’ll learn how to start a REPL process that’s connected to Emacs and how to work with Emacs windows. Then I’ll cover a cornucopia of useful key bindings for evaluating expressions, compiling files, and performing other handy tasks. Finally, I’ll show you how to handle Clojure errors and introduce some features of Paredit, an optional minor mode, which is useful for writing and editing code in Lisp-style languages.
If you want to start digging in to Clojure code, please do skip ahead! You can always return later.
Fire Up Your REPL!
As you learned in Chapter 1, a REPL allows you to interactively write and run Clojure code. The REPL is a running Clojure program that gives you a prompt and then reads your input, evaluates it, prints the result, and loops back to the prompt. In Chapter 1, you started the REPL in a terminal window with lein repl. In this section, you’ll start a REPL directly in Clojure.
To connect Emacs to a REPL, you’ll use the Emacs packageCIDER, available at https://github.com/clojure-emacs/cider/. If you followed the configuration instructions earlier in this chapter, you should already have it installed, but you can also install it by running M-x package-install, entering cider, and pressing enter.
CIDER allows you to start a REPL within Emacs and provides you with key bindings that allow you to interact with the REPL more efficiently. Go ahead and start a REPL session now. Using Emacs, open the file clojure-noob/src/clojure_noob/core.clj, which you created in Chapter 1. Next, use M-x cider-jack-in. This starts the REPL and creates a new buffer where you can interact with it. After a short wait (it should be less than a minute), you should see something like Figure 2-8.

Figure 2-8: What your Emacs should look like after running M-x cider-jack-in
Now we have two windows: our core.clj file is open on the left, and the REPL is running on the right. If you’ve never seen Emacs split in half like this, don’t worry! I’ll talk about how Emacs splits windows in a second. In the meantime, try evaluating some code in the REPL. Type in the following bolded lines. The result that you should see printed in the REPL when you press enter is shown after each line of code. Don’t worry about the code at this time; I’ll cover all these functions in the next chapter.
(+ 1 2 3 4)
; => 10
(map inc [1 2 3 4])
; => (2 3 4 5)
(reduce + [5 6 100])
; => 111
Pretty nifty! You can use this REPL just as you used lein repl in the first chapter. You can also do a whole lot more, but before I go into that, I’ll explain how to work with split-screen Emacs.
Interlude: Emacs Windows and Frames
Let’s take a quick detour to talk about how Emacs handles frames and windows, and to go over some useful window-related key bindings. Feel free to skip this section if you’re already familiar with Emacs windows.
Emacs was invented in, like, 1802 or something, so it uses terminology slightly different from what you’re used to. What you would normally refer to as a window, Emacs calls a frame, and the frame can be split into multiple windows. Splitting into multiple windows allows you to view more than one buffer at a time. You already saw this happen when you ran cider-jack-in (see Figure 2-9).

Figure 2-9: In Emacs, a frame contains windows.
Table 2-5 shows several key bindings for working with the frame and windows.
- Table 2-5: Emacs Window Key Bindings
| Keys | Description |
|---|---|
| C-x o | Switch cursor to another window. Try this now to switch between your Clojure file and the REPL. |
| C-x 1 | Delete all other windows, leaving only the current window in the frame. This doesn’t close your buffers, and it won’t cause you to lose any work. |
| C-x 2 | Split frame above and below. |
| C-x 3 | Split frame side by side. |
| C-x 0 | Delete current window. |
I encourage you to try the Emacs window key bindings. For example, put your cursor in the left window, the one with the Clojure file, and use C-x 1. The other window should disappear, and you should see only the Clojure code. Then do the following:
- Use C-x 3 to split the window side by side again.
- Use C-x o to switch to the right window.
- Use C-x b *cider-repl* to switch to the CIDER buffer in the right window.
Once you’ve experimented a bit, set up Emacs so that it contains two side-by-side windows with Clojure code on the left and the CIDER buffer on the right, as in the previous images. If you’re interested in learning more about windows and frames, the Emacs manual has a ton of info: see http://www.gnu.org/software/emacs/manual/html_node/elisp/Windows.html#Windows.
Now that you can navigate Emacs windows, it’s time to learn some Clojure development key bindings!
A Cornucopia of Useful Key Bindings
Now you’re ready to learn some key bindings that will reveal the true power of using Emacs for Clojure projects. These commands will let you evaluate, tweak, compile, and run code with just a few dainty keystrokes. Let’s start by going over how to quickly evaluate an expression.
At the bottom of core.clj, add the following:
(println "Cleanliness is next to godliness")
Now use C-e to navigate to the end of the line, and then use C-x C-e.The text Cleanliness is next to godliness should appear in the CIDER buffer, as shown in Figure 2-10.

Figure 2-10: Instantly evaluating code from another buffer in the REPL
The key binding C-x C-e runs the command cider-eval-last-expression. As the name suggests, this command sends the expression immediately preceding point to the REPL, which then evaluates the expression. You can also try C-u C-x C-e, which prints the result of the evaluation after point.
Now let’s try to run the -main function we wrote in Chapter 1 so we can let the world know that we’re little teapots.
In the core.clj buffer, use C-c M-n M-n. This key binding sets the namespace to the namespace listed at the top of your current file, so the prompt in the right window should now read clojure-noob.core>. I haven’t gone into detail about namespaces yet, but for now it’s enough to know that a namespace is an organizational mechanism that allows us to avoid naming conflicts. Next, enter (-main) at the prompt. The REPL should print I'm a little teapot! How exciting!
Now let’s create a new function and run it. At the bottom of core.clj, add the following:
(defn train
  []
  (println "Choo choo!"))
When you’re done, save your file and use C-c C-k to compile your current file within the REPL session. (You have to compile your code for the REPL to be aware of your changes.) Now if you run (train) in the REPL, it will echo back Choo choo!.
While still in the REPL, try C-↑ (ctrl plus the up arrow key). C-↑ and C-↓ cycle through your REPL history, which includes all the Clojure expressions that you’ve asked the REPL to evaluate.
Note for Mac users: by default, OS X maps C-↑, C-↓, C-←, and C-→ to Mission Control commands. You can change your Mac key bindings by opening System Preferences, and then going to Keyboard4Shortcuts4Mission Control.
Finally, try this:
- Type (-main at the REPL prompt. Note the lack of a closing parenthesis.
- Press C-enter.
CIDER should close the parenthesis and evaluate the expression. This is just a nice little convenience that CIDER provides for dealing with so many parentheses.
CIDER also has a few key bindings that are great when you’re learning Clojure. Pressing C-c C-d C-d will display documentation for the symbol under point, which can be a huge time-saver. When you’re done with the documentation, press q to close the documentation buffer. The key binding M-. will navigate to the source code for the symbol under point, and M-, will return you to your original buffer and position. Finally, C-c C-d C-a lets you search for arbitrary text across function names and documentation. This is a great way to find a function when you can’t exactly remember its name.
The CIDER README (https://github.com/clojure-emacs/cider/) has a comprehensive list of key bindings that you can learn over time, but for now, Tables 2-6 and 2-7 contain a summary of the key bindings we just went over.
- Table 2-6: Clojure Buffer Key Bindings
| Keys | Description |
|---|---|
| C-c M-n M-n | Switch to namespace of current buffer. |
| C-x C-e | Evaluate expression immediately preceding point. |
| C-c C-k | Compile current buffer. |
| C-c C-d C-d | Display documentation for symbol under point. |
| M-. and M-, | Navigate to source code for symbol under point and return to your original buffer. |
| C-c C-d C-a | Apropros search; find arbitrary text across function names and documentation. |
- Table 2-7: CIDER Buffer Key Bindings
| Keys | Description |
|---|---|
| C-↑, C-↓ | Cycle through REPL history. |
| C-enter | Close parentheses and evaluate. |
How to Handle Errors
In this section, you’ll write some buggy code so you can see how Emacs responds to it and how you can recover from the error and continue on your merry way. You’ll do this in both the REPL buffer and the core.clj buffer. Let’s start with the REPL. At the prompt, type (map) and press enter. You should see something like Figure 2-11.

Figure 2-11: This is what happens when you run bad code in the REPL.
As you can see, calling map with no arguments causes Clojure to lose its mind—it shows an ArityException error message in your REPL buffer and fills your left window with text that looks like the ravings of a madman. These ravings are the stack trace, which shows the function that actually threw the exception, along with which function called that function, down the stack of function calls.
Clojure’s stack traces can be difficult to decipher when you’re just starting, but after a while you’ll learn to get useful information from them. CIDER gives you a hand by allowing you to filter stack traces, which reduces noise so you can zero in on the cause of your exception. Line 2 of the *cider-error* buffer has the filters Clojure, Java, REPL, Tooling, Duplicates, and All. You can click each option to activate that filter. You can also click each stack trace line to jump to the corresponding source code.
Here’s how to close the stack trace in the left window:
- Use C-x o to switch to the window.
- Press q to close the stack trace and go back to CIDER.
If you want to view the error again, you can switch to the *cider-error* buffer. You can also get error messages when trying to compile files. To see this, go to the core.clj buffer, write some buggy code, and compile:
- Add
(map)to the end. - Use C-c C-k to compile.
You should see a *cider-error* buffer similar to the one you saw earlier. Again, press q to close the stack trace.
Paredit
While writing code in the Clojure buffer, you may have noticed some unexpected things happening. For example, every time you type a left parenthesis, a right parenthesis immediately gets inserted.
This occurs thanks to paredit-mode, a minor mode that turns Lisp’s profusion of parentheses from a liability into an asset. Paredit ensures that all parentheses, double quotes, and brackets are closed, relieving you of that odious burden.
Paredit also offers key bindings to easily navigate and alter the structure created by all those parentheses. In the next section, I’ll go over the most useful key bindings, but you can also check out a comprehensive cheat sheet at https://github.com/georgek/paredit-cheatsheet/blob/master/paredit-cheatsheet.pdf(in the cheat sheet, the red pipe represents point).
However, if you’re not used to it, paredit can sometimes be annoying. I think it’s more than worth your while to take some time to learn it, but you can always disable it with M-x paredit-mode, which toggles the mode on and off.
The following section shows you the most useful key bindings.
Wrapping and Slurping
Wrapping surrounds the expression after point with parentheses. Slurping moves a closing parenthesis to include the next expression to the right. For example, say we start with this:
(+ 1 2 3 4)
and we want to get this:
(+ 1 (* 2 3) 4)
We can wrap the 2, add an asterisk, and then slurp the 3. First, place point, which is represented here as a vertical pipe, |:
(+ 1 |2 3 4)
Then type M-(, the binding for paredit-wrap-round, getting this result:
(+ 1 (|2) 3 4)
Add the asterisk and a space:
(+ 1 (* |2) 3 4)
To slurp in the 3, press C-→:
(+ 1 (* |2 3) 4)
This makes it easy to add and extend parentheses without wasting precious moments holding down arrow keys to move point.
Barfing
Suppose, in the preceding example, you accidentally slurped the four. To unslurp it (also known as barfing), place your cursor (|) anywhere in the inner parentheses:
(+ 1 (|* 2 3 4))
Then use C-←:
(+ 1 (|* 2 3) 4)
Ta-da! Now you know how to expand and contract parentheses at will.
Navigation
Often when writing in a Lisp dialect, you’ll work with expressions like this:
(map (comp record first)
     (d/q '[:find ?post
            :in $ ?search
            :where
            [(fulltext $ :post/content ?search)
             [[?post ?content]]]]
          (db/db)
          (:q params)))
With this kind of expression, it’s useful to jump quickly from one subexpression to the next. If you put point right before an opening parenthesis, C-M-f will take you to the closing parenthesis. Similarly, if point is right after a closing parenthesis, C-M-b will take you to the opening parenthesis.
Table 2-8 summarizes the paredit key bindings you just learned.
- Table 2-8: Paredit Key Bindings
| Keys | Description |
|---|---|
| M-x paredit-mode | Toggle paredit mode. |
| M-( | Surround expression after point in parentheses (paredit-wrap-round). |
| C-→ | Slurp; move closing parenthesis to the right to include next expression. |
| C-← | Barf; move closing parenthesis to the left to exclude last expression. |
| C-M-f, C-M-b | Move to the opening/closing parenthesis. |
Continue Learning
Emacs is one of the longest-lived editors, and its adherents often approach fanaticism in their enthusiasm for it. It can be awkward to use at first, but stick with it and you will be amply rewarded over your lifetime.
Whenever I open Emacs, I feel inspired. Like a craftsman entering his workshop, I feel a realm of possibility open before me. I feel the comfort of an environment that has evolved over time to fit me perfectly—an assortment of packages and key bindings that help me bring ideas to life day after day.
These resources will help you as you continue on your Emacs journey:
- The Emacs Manual provides excellent, comprehensive instructions. Spend some time with it every morning! Download the PDF and read it on the go: http://www.gnu.org/software/emacs/manual/html_node/emacs/index.html#Top.
- The Emacs Reference Card is a handy cheat sheet: http://www.ic.unicamp.br/~helio/disciplinas/MC102/Emacs_Reference_Card.pdf.
- Mastering Emacs by Mickey Petersen is one of the best Emacs resources available. Start with the reading guide: http://www.masteringemacs.org/reading-guide/.
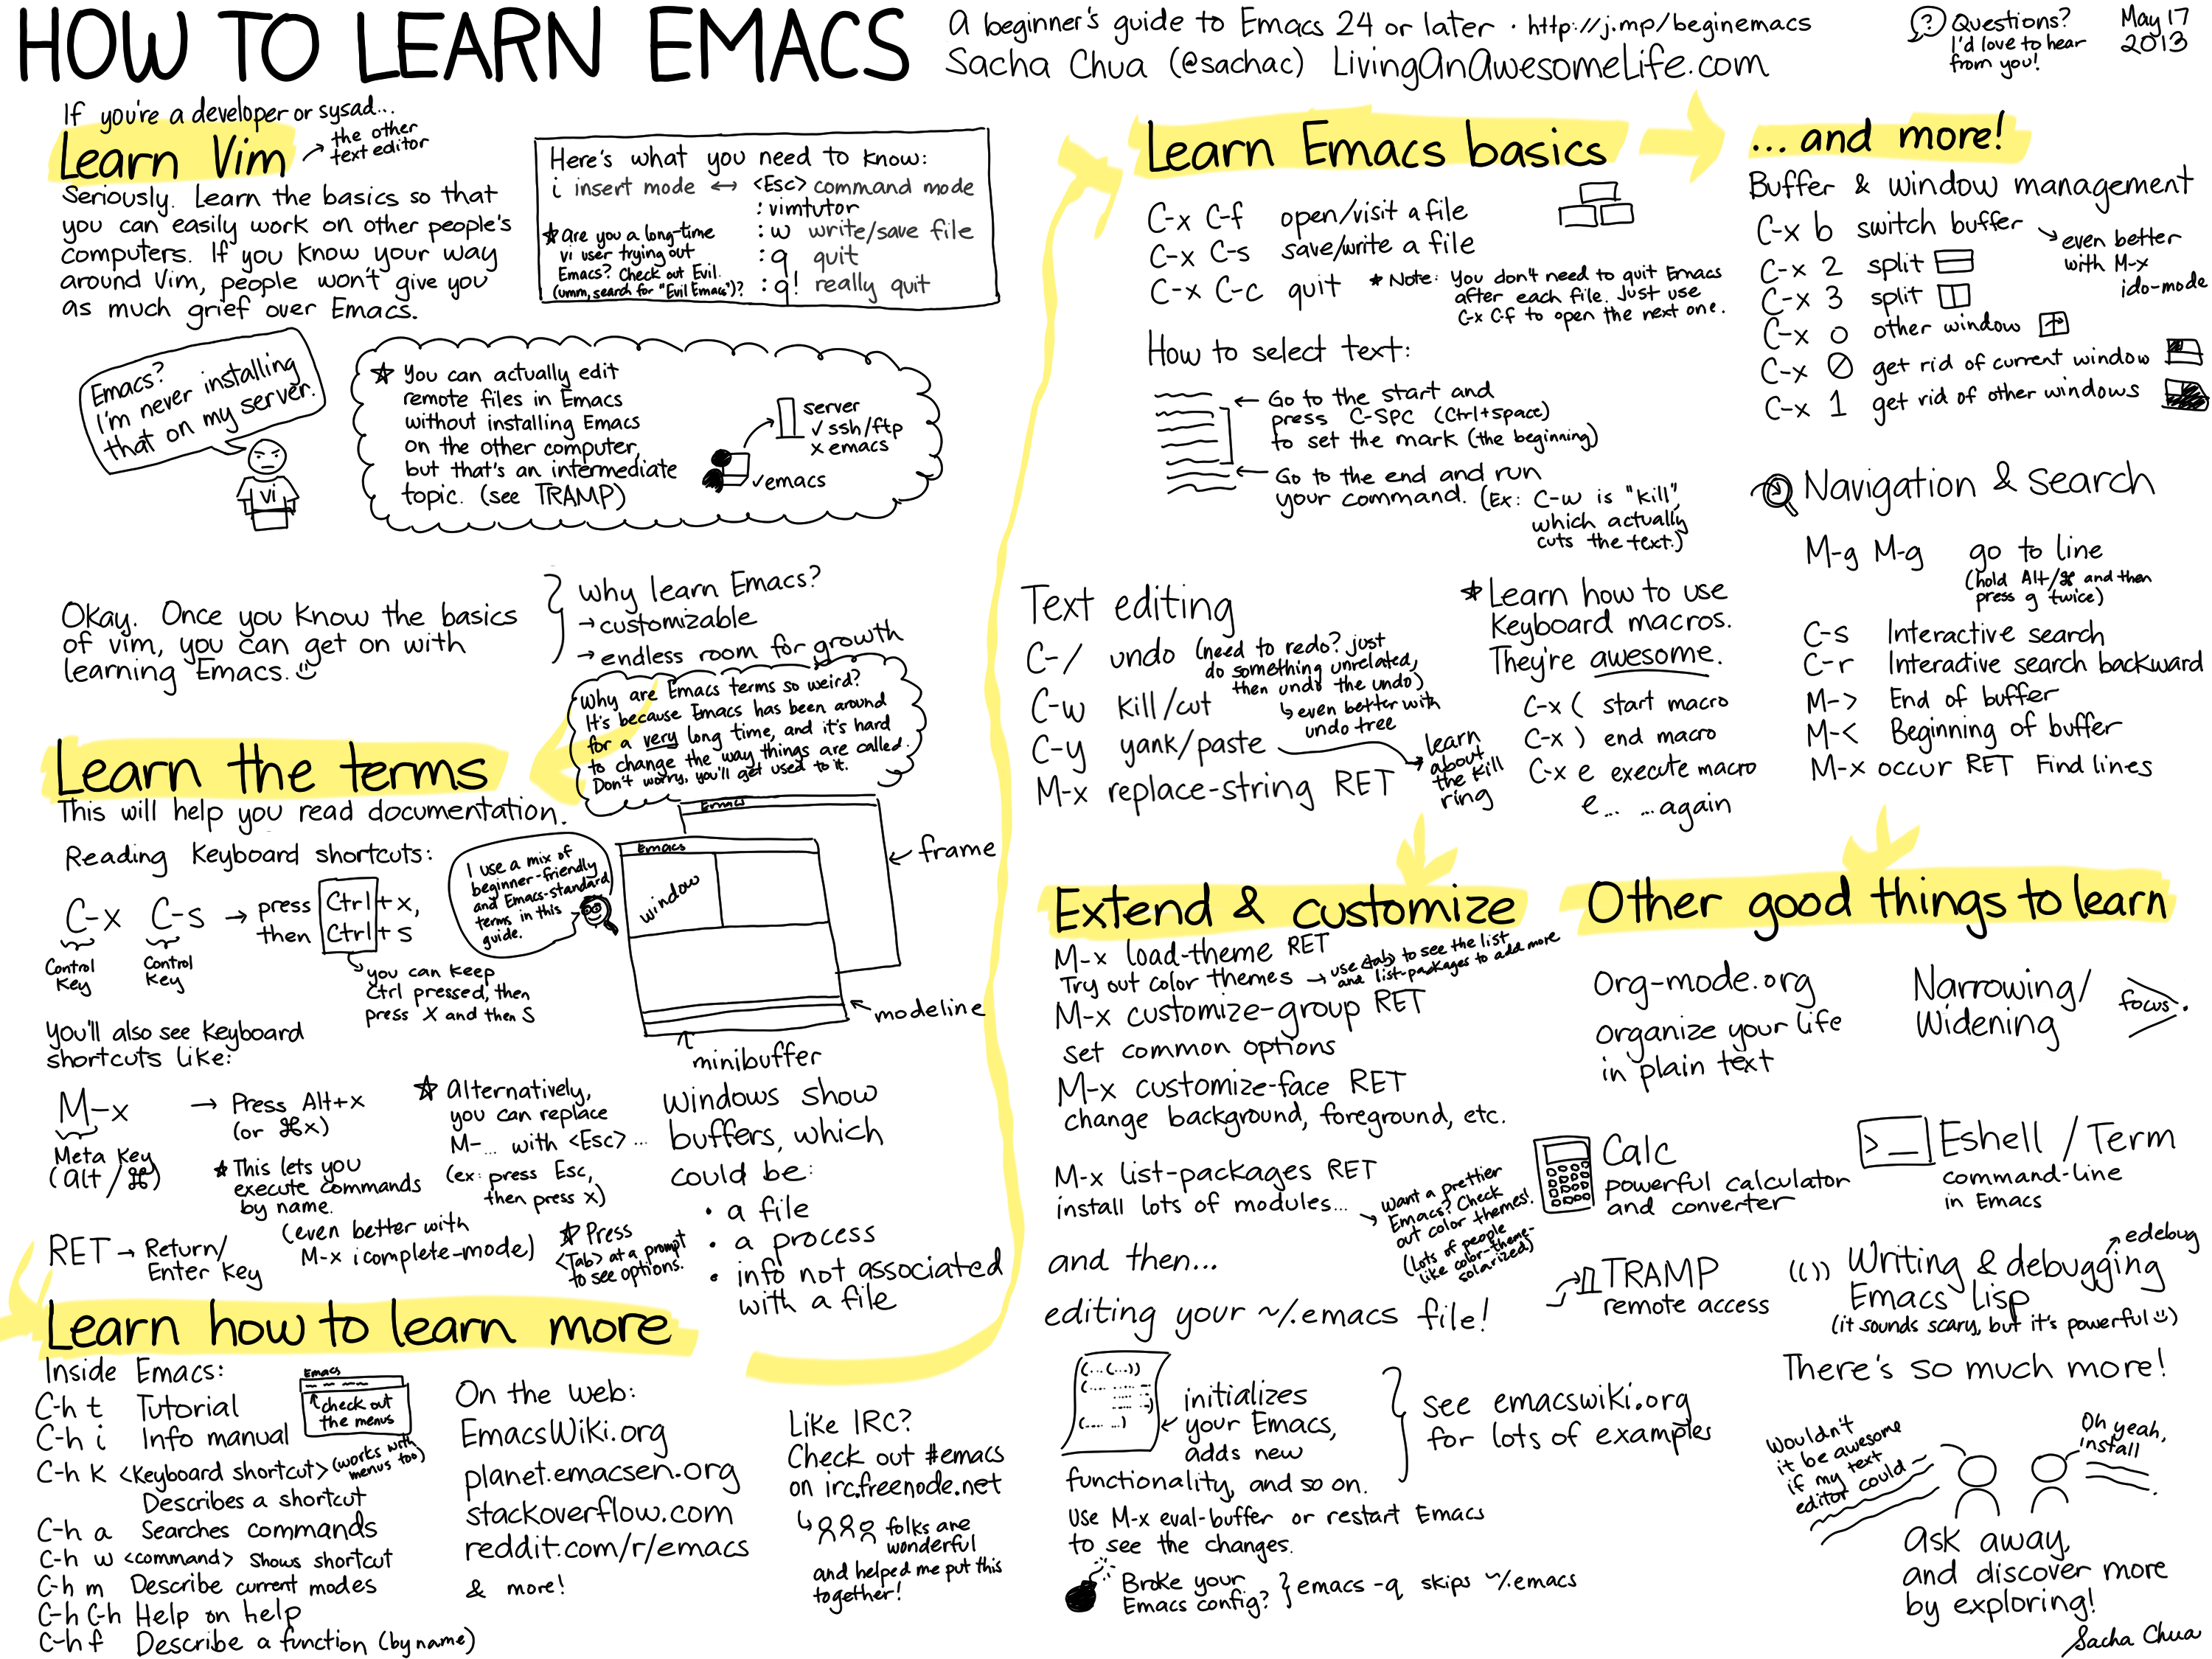
- For the more visually minded folks, I recommend the hand-drawn “How to Learn Emacs: A Beginner’s Guide to Emacs 24 or Later” by Sacha Chua: http://sachachua.com/blog/wp-content/uploads/2013/05/How-to-Learn-Emacs8.png.
- Just press C-h t for the built-in tutorial.
Summary
Whew! You’ve covered a lot of ground. You now know about Emacs’s true nature as a Lisp interpreter. Key bindings act as shortcuts to execute elisp functions, and modes are collections of key bindings and functions. You learned how to interact with Emacs on its own terms and mastered buffers, windows, regions, killing, and yanking. Finally, you learned how to easily work with Clojure using CIDER and paredit.
With all of this hard-won Emacs knowledge under your belt, it’s time to start learning Clojure in earnest!
 The print book longs for you to own it
 OMG what!? Another book!?
 Great mama of the bahamas! Learn about reducers!